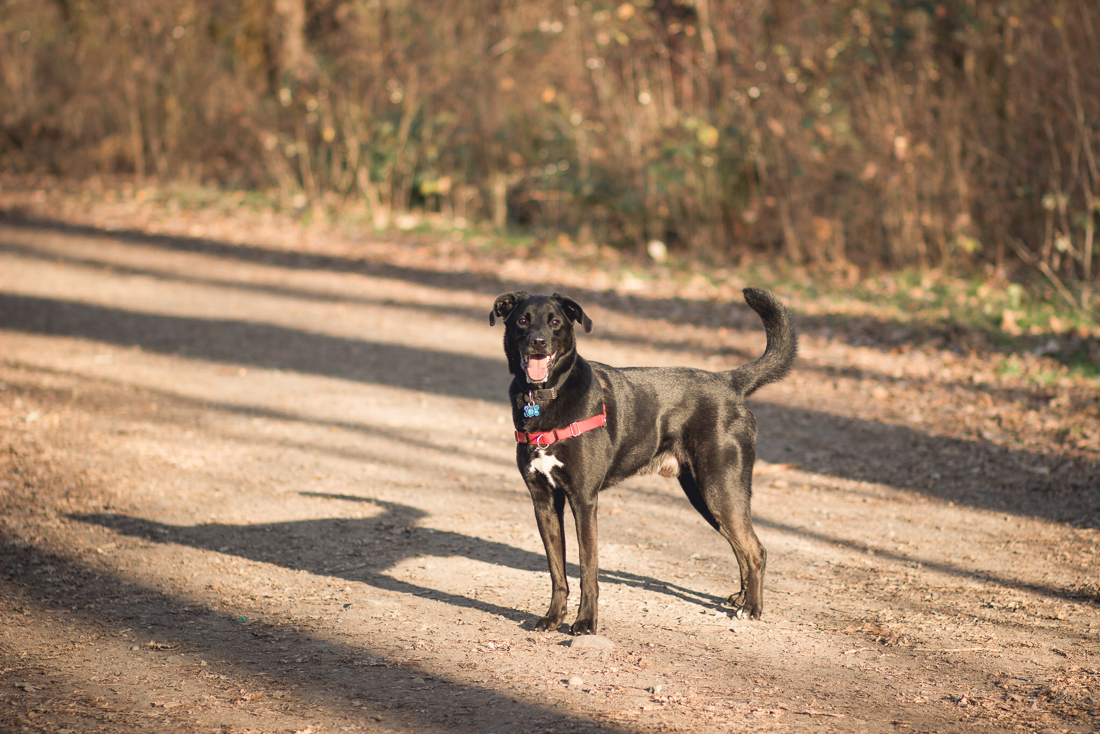
Aperture I would say aperture is the classic professional photographer calling card. A wide open aperture (smallest number, like f1.8) creates the wonderful blurred, bokeh backgrounds. My prime lens creates speckled, soft backgrounds, especially when your subject is close to you and the background is as far away as possible. And if your aperture is stopped down (larger number, like f11) a greater range will be in focus which might work well for landscape or a large family portrait. Shutter Speed If you’re photographing kids or animals, you want to make sure your shutter speed is fast enough to freeze the motion. And if you want to brighten a dark landscape or blur moving water, your shutter speed needs to be long enough to achieve what you want to create. And another use for shutter speed is when you have a lens with no IM (image stabilization), you need to have your shutter speed greater than the focal length or else the image might be blurred. ISO Anywhere dark or dimly lit, the ISO is the underdog to brighten up your exposure. Sure you might have your aperture wide open and your shutter speed the slowest you dare to keep things sharp, but your ISO is the one to battle the darkness, but it’s easy to overdo. If you bump up your ISO too much, your image might become grainy and still a little dark. It’s all a balancing act... When you decide to capture a moment, decide what’s the most important part of the triangle for your image. If it’s a running animal or playing child, then I would say the shutter speed is really important so that your moving subject is in focus. Then again, you might want the amazing bokeh with your laughing little one, so you want the aperture wide open. Something to try for this would be to set your aperture how you want it, up the shutter speed to freeze any motion and then set the ISO up to pick up any slack left. So on a sunny day, my camera settings might be f2.0, 1/500 (or more if very sunny), and 100 ISO (maybe 200+ if in shade). The best way to learn is to do; practice everyday, even if a little everyday. The more you practice, the better you will be, because every scenario is different with subject, lighting, and location. There’s no way for anyone to tell you what your settings should be until you’re there and in the thick of it. Above are two images, taken three years apart. On the left is an image I took within the first month of learning the exposure triangle and looking back I see how I could have improved. I had the aperture at its widest allowed by my kit lens and my shutter speed was way too high, thus my ISO needed to be higher than necessary. It’s a clear image with a decent composition in a backyard all in shade. The image on the right, was taken a couple weeks ago after years of practice with the exposure triangle. The settings are near perfect; the aperture is wide open just melting away the background, the shutter speed is plenty fast to freeze any motion, and the ISO is at it’s lowest to minimize any grain. Plus, my subject (my pup, Coal), is in full sun with no distracting shadows on his body and I really like the composition even if I was semi-squatting to be on his eye level. (If you want to see the camera settings, select/click on the images to read the captions with my settings.)
One more little tip is to shoot in RAW, instead of JPEG, especially if you edit your images in Lightroom or PhotoShop there’s a lot more wiggle room when it comes to making adjustments. The easiest way to explain it is that RAW records all the raw data and the image will look dull SOOC (Straight Out Of Camera). While a JPEG will be saved on your memory card compressed and with contrast, so the image will look more complete and normal SOOC, but you will be limited with any adjustments when it comes to editing.
2 Comments
Deborah Shaw Mancini
2/3/2018 05:21:10 pm
Love your work and great tips
Elizabeth Z.
3/7/2018 07:19:30 pm
Thank you! Leave a Reply. |
Hello!I hope you stay awhile. This is where I will talk about my paintings, processes, photography & adventures, post processing, social media, and more. 
Categories
All
Archives
November 2023
© Western Rose Studios, LLC 2014 - 2022
Salem, Oregon Artist, Photographer & Educator |